Moving your crypto to a hardware wallet is one of the best security upgrades you can make. Although it might sound complicated, it’s just a transfer with a few extra safety steps. Here’s how to do it right.
Key Takeaways
- Moving crypto is just a standard transfer: You’re sending funds to an address secured by your hardware wallet’s private keys.
- Security comes from offline key storage: Transactions require physical confirmation, protecting you from remote attacks.
- Accuracy matters: Always verify the address and network before sending, since transactions can’t be reversed.
- Test first, then transfer fully: Send a small test amount first, especially on your first transfer. Crypto transactions are irreversible, so a quick test removes a lot of risk
- Best hardware wallet: Solflare Shield combines cold storage security with your regular wallet app. No separate apps, no cables, just a tap to approve transactions.
You’ve probably heard the advice: “move your crypto to a hardware wallet”. It comes up constantly, especially once you’re holding amounts worth protecting.
But if you’ve never done it before, it can feel a bit intimidating.
What does “moving crypto” actually mean? Where do you send it? What if you make a mistake?
The good news is that it is just a transfer, like any other. The destination happens to be an address secured by a physical device, but the mechanics are the same.
In this guide, we’ll walk through exactly how to move your crypto to a hardware wallet, and what to watch out for along the way.
What Is a Hardware Wallet?
A hardware wallet is a physical device that stores your private keys offline.
Instead of keeping your keys on a phone, browser, or computer (which are connected to the internet), a hardware wallet keeps them away from online exposure.
That’s what makes it one of the most secure ways to store crypto.
If you want a full breakdown of how hardware wallets work and when you need one, we cover it in detail here.
What Does It Mean to “Move Crypto” to a Hardware Wallet?
When you “move” crypto to a hardware wallet, you’re sending it to a wallet address that is controlled by your hardware wallet’s private keys.
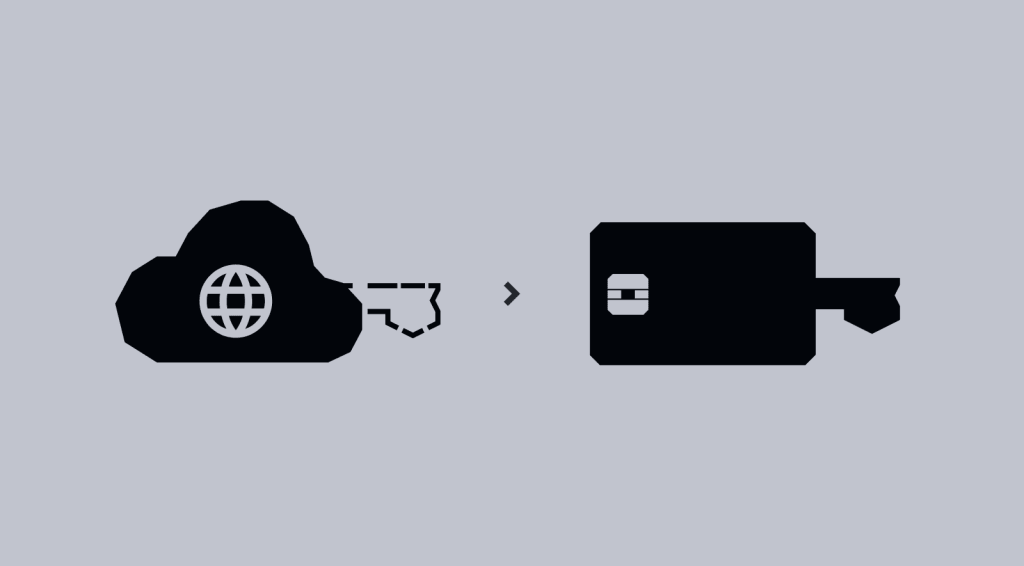
In other words:
- Your crypto is assigned to a new address
- That address is secured by keys stored offline (on the hardware device)
Your crypto doesn’t physically move anywhere. It stays on the blockchain, the same as always. What changes is which set of keys controls it. Instead of keys stored on an internet-connected device, the assets are now secured by keys stored offline on the physical device.
In practice, that means every transaction from that point forward requires physical confirmation on the device itself. Someone who compromises your computer or phone can’t move your funds without also having the hardware wallet in their hands.
That’s the security upgrade a hardware wallet actually provides – not storage, but control that can’t be accessed remotely.
Before You Start (Important Checks)
Moving crypto to a hardware wallet is usually simple, but there are a few things you should double-check before sending anything.
Your hardware wallet should already be set up. Before transferring anything, make sure your device is initialized, your recovery phrase is written down and stored somewhere safe, and it’s connected to its companion app. If you haven’t completed the setup yet, do that first.
Make sure the network matches. The asset you’re sending and the receiving address need to be on the same network. SOL goes to a Solana address, and ETH goes to an Ethereum address. Don’t type the address manually. Copy it directly from the app, and verify the first and last few characters before sending.
Check that you have enough for fees. Every transaction requires a small network fee. Make sure your sending wallet has enough balance to cover it, otherwise the transaction won’t go through.
Keep your recovery phrase secure. If something happens to your device, your recovery phrase is the only way to restore access to your wallet. Write it down, store it offline, and never share it with anyone. Losing it means losing access to your funds permanently.
How to Move Crypto to a Hardware Wallet (Step-by-Step)
Once your hardware wallet is set up, moving your crypto is just a standard transfer.
Here’s exactly how to do it.
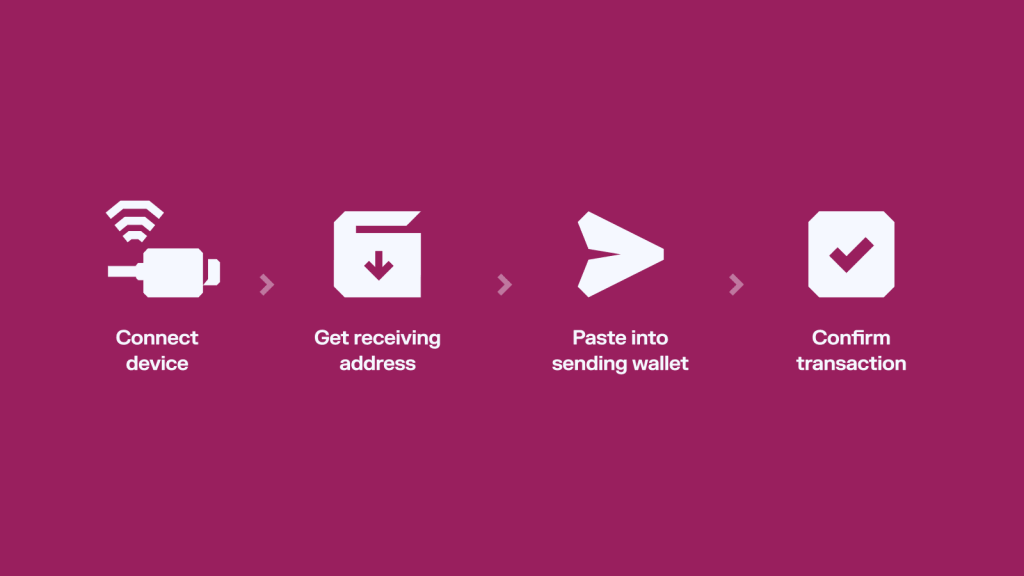
Step 1: Connect your hardware wallet
Start by connecting your hardware wallet to your computer or phone.
Open the wallet’s companion app (for example, Ledger Live, Trezor Suite, or a supported wallet app like Solflare).
Make sure your device is unlocked and the correct app/network is open on the device.
Step 2: Get your receiving address
In the app:
- Go to Deposit -> Receive Crypto
- Select the asset you want to receive (e.g., SOL, ETH, BTC)
- Copy the wallet address shown
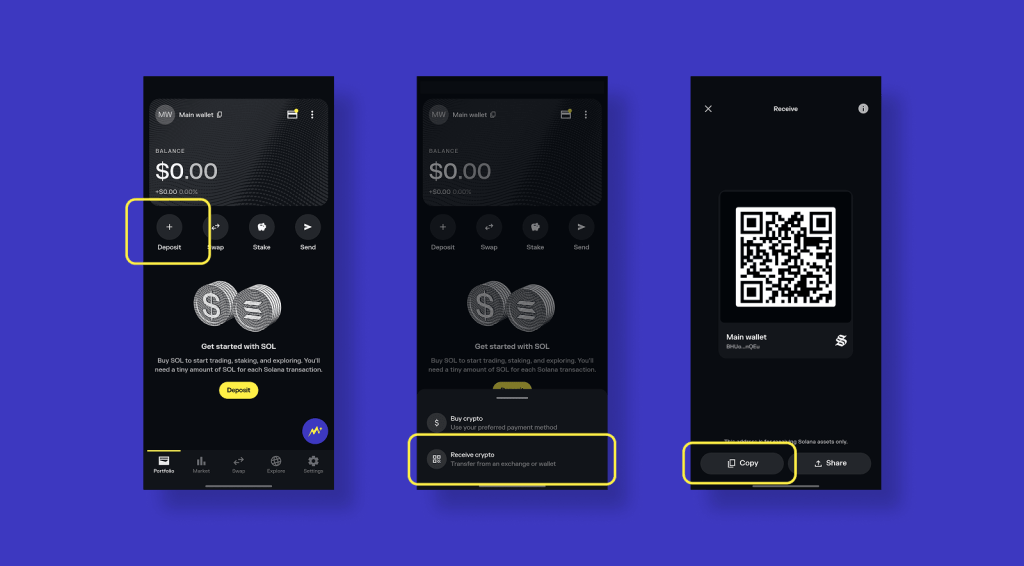
Your hardware wallet will usually display the same address on the device screen.
Always verify that the address on your screen matches the one shown on the physical device. This protects you from malware or fake addresses.
Step 3: Paste the address
Go to your sending wallet or exchange where your crypto is currently stored.
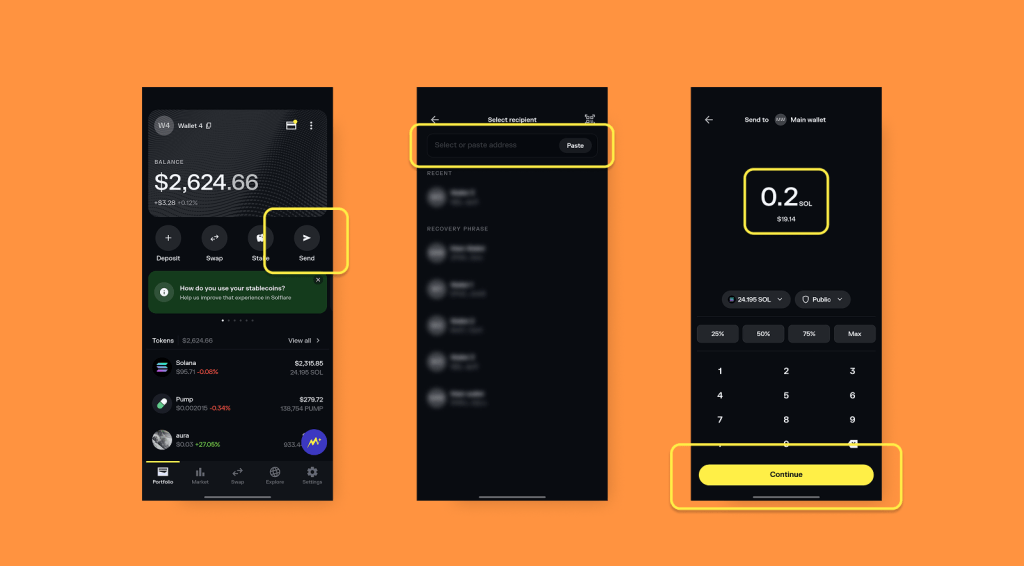
Go to the Send or Withdraw section and paste your hardware wallet address into the recipient field.
Select the correct network and enter the amount you want to send
Take a moment to double-check the address and the network.
Note: Always make sure you choose the correct network, depending on the type of crypto you are sending. For example, you will use the Solana network for Solana-based tokens or ERC-20 for tokens on the Ethereum network.
Step 4: Confirm the transaction
Approve the transaction in your sending wallet. If required, confirm it again on your hardware wallet device (if you are using the Solflare Shield hardware wallet, everything’s done through the Solflare wallet app, as shown below).
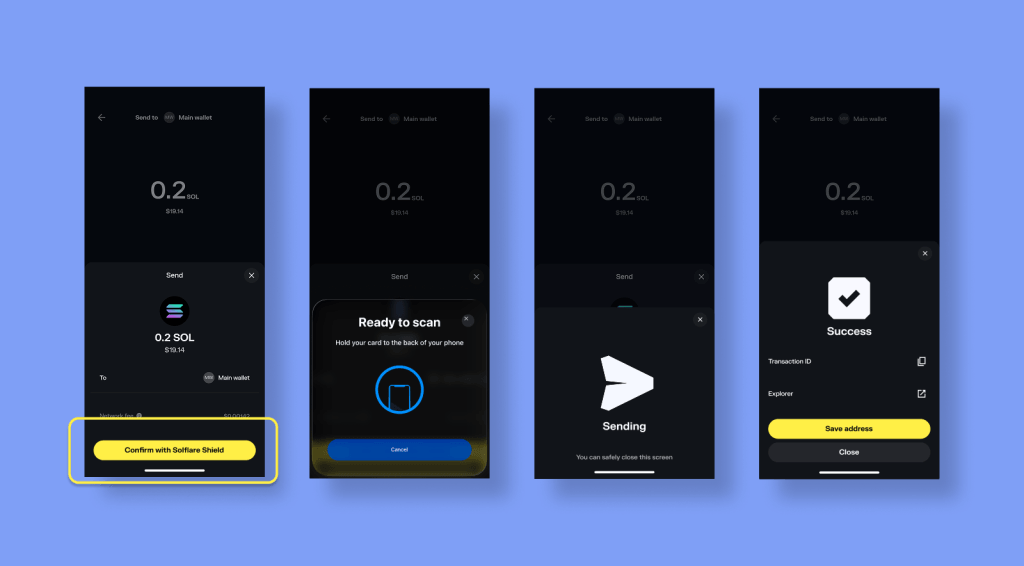
After that, the transaction is sent to the network.
Note: If this is your first transfer, try sending a small amount first and wait for it to arrive. Once confirmed, proceed with the full amount.
After a short time (usually seconds to minutes, depending on the network), your funds should appear in your hardware wallet.
Common Mistakes to Avoid
Here are the most common ones to watch out for.
Sending to the Wrong Address
Crypto transactions can’t be reversed. If you send funds to the wrong address, they’re gone.
This usually happens due to:
- copy/paste errors
- malware replacing addresses
- manual typing mistakes
Always double-check the first and last few characters before sending.
Using the Wrong Network
Not all assets exist on the same network.
For example:
- SOL must be sent on the Solana network
- ETH must be sent on Ethereum
Sending assets to the wrong network can result in lost or inaccessible funds.
Always confirm the network before sending.
Sending Everything at Once
If it’s your first time transferring to a hardware wallet, avoid sending your full balance immediately.
Start with a small test transaction first. It adds a few minutes, but removes uncertainty.
Losing Your Recovery Phrase
Your hardware wallet can be replaced. Your recovery phrase cannot.
If you lose it and you stay “locked out” of your crypto, there’s no way to restore it. You lose access to your funds permanently, and if somebody else gets to itt, they can take it all.
Store your recovery phrase securely, offline, and never share it.
Connecting to the wrong apps
Fake apps and phishing sites can imitate real wallet interfaces. If you connect your hardware wallet to a malicious app, you could approve harmful transactions.
Only use official apps and trusted links.
Rushing the process
Most mistakes happen when people are in a hurry. Crypto doesn’t have an “undo” button.
Slow down, review everything, and confirm carefully.
The Easiest Way to Move to a Hardware Wallet
If you’ve followed the steps above, you’ve probably noticed something:
Moving crypto to a hardware wallet usually means working across two separate tools: a software wallet (or exchange) and a hardware device.
That setup works, but it can feel a bit fragmented.
Solflare Shield takes a different approach by bringing both into the same experience.
Hardware wallet security built into your wallet app
Solflare Shield is a hardware wallet that works directly inside the Solflare app. There’s no separate companion app to manage, no cables, no charging devices. You use Solflare the same way you always would — and the Shield acts as your physical confirmation layer on top of it.
The device itself is card-shaped and uses tap-to-sign NFC. To approve a transaction, you tap it against your phone. That’s it. Your private keys are stored securely on the device and never leave it, so you get the same cold storage protection as a traditional hardware wallet, without the added complexity.
How is this different from a standard hardware wallet setup?
With a typical hardware wallet, you send funds to a separate address and manage them through a dedicated app. With Solflare Shield, your software wallet and hardware wallet live in the same app. You can move between them, manage your assets, and approve transactions all within Solflare, without switching tools or learning a new interface.
For anyone moving from a hot wallet to cold storage for the first time, that makes the transition much smoother. You’re not learning a new system, only adding a layer of security to the one you’re already using.
Learn more: How to Get and Use the Solflare Shield
Where to Go From Here
Moving your crypto to a hardware wallet is one of the simplest ways to improve your security.
Once it’s done, you’re no longer relying on an internet-connected device to protect your keys, which removes a large part of the risk.
The process itself isn’t complicated. It’s a transaction like any other, just with a few extra checks worth building into your routine from the start. Verify the address, confirm the network, test with a small amount first. Do it once and it becomes second nature.
If you’re ready to make the move, Solflare Shield gives you cold storage security without the friction of a traditional setup.
Cold Storage Security without friction
Solflare Shield keeps everything in the Solflare app. No separate apps, no cables, no charging. A tap-to-sign hardware wallet card.
FAQs
Is moving crypto to a hardware wallet safe?
Yes, as long as you follow the correct steps.
The transfer itself is just a normal blockchain transaction. The main risks come from user errors like sending to the wrong address, using the wrong network, or interacting with fake apps. Double-checking details and using official tools makes the process very safe.
What does it actually mean to move crypto to a hardware wallet?
It means sending your crypto to a wallet address controlled by your hardware wallet.
Your crypto doesn’t physically move anywhere. It stays on the blockchain, but the private keys controlling it are now stored offline on your hardware device.
Do I need to move all my crypto at once?
No, and it’s better not to.
If it’s your first time, start with a small test transaction. Once you confirm everything works as expected, you can transfer the rest.
How long does it take to transfer crypto to a hardware wallet?
It depends on the network.
Most transactions take anywhere from a few seconds (e.g. Solana) to a few minutes (e.g. Ethereum or Bitcoin). In some cases, it may take longer during network congestion.
What happens if I send crypto to the wrong address?
The transaction cannot be reversed.
If you send crypto to the wrong address, the funds are usually lost permanently. That’s why it’s important to always double-check the address before confirming.
What happens if I choose the wrong network?
Your funds can become inaccessible or lost.
Some assets exist on multiple networks, but not all wallets support recovering funds sent on the wrong one. Always make sure the sending and receiving networks match.
Do I need my hardware wallet connected to receive crypto?
No.
You only need the wallet address to receive crypto. The hardware device is required when you want to send funds or approve transactions.
Can someone steal my crypto if they have my wallet address?
No.
A wallet address is public and safe to share. It only allows others to send you crypto or view your transactions. It does not give access to your funds.
What happens if I lose my hardware wallet?
You can recover your funds using your recovery phrase.
As long as you have your recovery phrase (seed phrase), you can restore your wallet on a new device. Without it, your funds are permanently lost.
Do I need a hardware wallet to keep my crypto safe?
Not necessarily, but it’s recommended for larger amounts.
Software (hot) wallets are fine for everyday use, but hardware wallets provide an extra layer of protection by keeping your private keys offline.
Can I move crypto back from a hardware wallet?
Yes. You can send crypto from your hardware wallet at any time by connecting the device and approving the transaction. The process is the same as sending from any other wallet, with an extra confirmation step on the device.